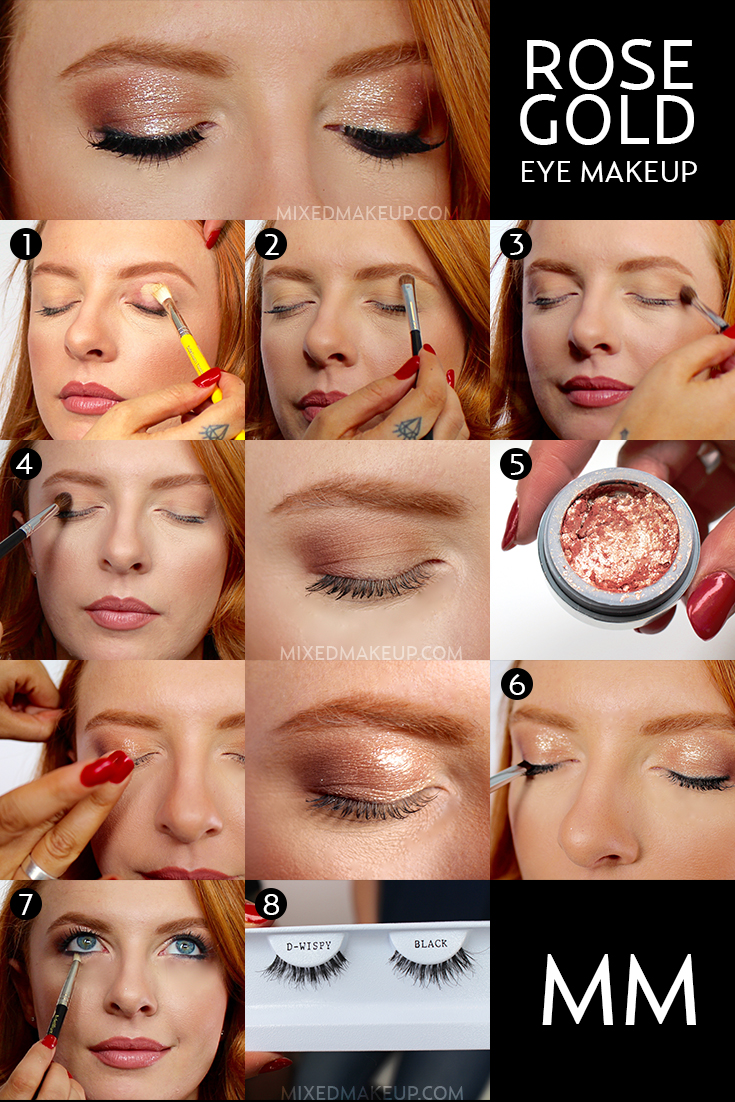
Rose Gold Eye Makeup for New Year's Eve!
Rose gold is a popular choice for jewelry and now you can wear it on your eyes. Trust us, your makeup will be a hit at your New Year's Eve gathering. Follow this step-by-step guide from makeup artist Nikki La Rose to get this beautiful rose gold eye makeup look now.
Step 1: Prime your eyelids
If you want your look to last, this is a super important first step especially if you have oily eyelids. Use a yellow based primer like MAC Pro Longwear Paint Pot ($22) in Soft Ochre to even out and neutralize. This one goes on as a cream and dries to a powder finish, so you can start your eye makeup right away.
Find out how to cover dark circles.
Step 2: Apply the lightest color first
Eye makeup blends best if you apply it from lightest to darkest. Start by applying MAC Eyeshadow ($16) in Mylar under the brows and on the tear duct to brighten up the eyes.
Step 3: Apply your crease color
Always apply your crease color with a fluffy brush. Apply Morphe Eyeshadow in ES13-Deep Skin starting on the outer corner of the eye because thats usually where you want the color to be the strongest and apply it in small circular motions. Then use a windshield wiper motion to brush the color inward. You want the color to go from light to dark. You want to begin with just a little color at first and then build from there. Otherwise, it’s hard to blend if you have too much color on.
Step 4: Apply the darkest color
Blend MAC Eyeshadow in Foile on the outer corners of your eyes in a sideways V shape.
Step 5: Rose gold time!
The star of this look is Stila Magnificent Foil Shadow ($32) in Kitten. This product goes on best if you apply it with your fingertips. Just put a small amount on the back of your hand and warm it up with your finger before you apply it all over your eyelid. Start with a thin layer and build the color from there. If you start too thick, it’ll cake up and crumble. Pay special attention to the center of the eyelid because that's where the light picks it up the most.
Step 6: Line your top lashes
Use a black pencil liner like L.A. Girl Glide Gel Liner ($3) in Very Black to tightline your top lash line. This is great because when you blink the color transfers to your bottom lash line. Just use a flat makeup brush to smudge out the bottom.
To create a little bit of a smoky look, use a brush to push the liner onto the top lash line. Don’t worry about creating a straight line—it’s more of a diffused look.
Step 7: Line your lower lashes
Take the darkest color that you used on the outer corners of the eyes and use a pencil brush to smudge it along your bottom lash line.
Step 8: Finishing touches
Apply mascara to your top and bottom lashes and add in some false lashes if you want to add extra drama. TIP: If you get mascara where you don’t want it, let it dry completely and then take a pencil brush and buff it away. Don’t clean it up while its still wet because that makes it smear.
Here's the final look!
Check out more of Nikki's work on her Instagram @makeupbynikkilarose.


